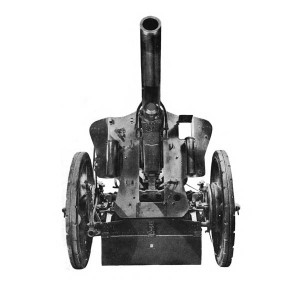
Instruction for demolition of the 155-mm gun M2 from the WWII U.S. War Department Technical Manual TM 9-350: 155-mm Gun M2; Carriage M1 and M1A1, Gun Mount M13; Heavy Carriage Limber M2 and M5; and Firing Platform M1, May 1945.
DEMOLITION TO PREVENT ENEMY USE
34. GENERAL.
a. The destruction of the materiel, subject to capture or abandonment in the combat zone, will be undertaken by the using arm only on authority delegated by the division or higher commander as a command function when such action is deemed necessary as a final resort to keep the materiel from reaching enemy hands.
b. Adequate destruction of artillery materiel means damaging it in such a way that the enemy cannot restore it to usable condition in the combat zone either by repair or by cannibalization. Adequate destruction requires that:
(1) Enough parts essential to the operation of the materiel must be damaged.
(2) Parts must be damaged beyond repair in the combat zone.
(3) The same parts must be destroyed on all materiel, so that the enemy cannot make up one operating unit by assembling parts from several partly destroyed units.
c. The tube and breech are the most vital parts of any piece of artillery. These are the first things to damage. After the tube and breech in importance come the recoil mechanism, sighting and fire control equipment, carriage, tires, gun book, and firing tables.
35. METHODS.
a. General.
(1) The destruction procedures outlined are arranged in order of effectiveness. Destruction should be accomplished by method No. 1, if possible. If method No. 1 cannot be used, destruction should be accomplished by one of the other methods outlined, in the priority shown.
(2) Whichever method is used, the sequence outlined must be followed. Uniformity of destruction will then be obtained, whether or not the method is carried to completion.
(3) Certain of the methods outlined require special tools and materials, such as nitrostarch and incendiary grenades, which may not be items of issue normally. The issue of such special tools and material, the vehicles for which issued, and the conditions under which destruction will be effected are command decisions in each case, according to the tactical situation.
(4) SIGHTS. Detach all optical sights. If evacuation is possible, carry the sights; if evacuation is not possible, thoroughly smash the sights.
b. Method No. 1 — destruction of tube, breech, and recoil mechanism.
(1) Open drain plug on recoil mechanism, allowing recoil fluid to drain. It is not necessary to wait for the recoil fluid to drain completely before firing the cannon in step (4), below.
(2) Place an armed (safety pin removed) antitank grenade M9A1, HE, or armed (safety pin removed) antitank rocket M6 in the tube with the nose end toward the rear. The grenade or rocket must be centered in the tube, using a wooden adapter. An alternate for the wooden adapter is the use of waste.
(3) Insert an unfuzed HE complete round or HE shell with propelling charge into the cannon and close the breech. Base-detonating HE shell cannot be used in this method.
(4) Fire the cannon, using a lanyard at least 100 feet long. The person firing should be under cover to the rear of the piece and approximately 20 degrees off the line of fire. Elapsed time: Approximately 2 to 3 minutes.
(5) The danger zone is approximately 500 yards.
c. Method No. 2.
(1) Insert TNT blocks in the bore, near the muzzle and in the chamber of the cannon. Close the breechblock as far as possible without damaging the safety fuse. Plug the muzzle tightly with earth to a distance of approximately 3 calibers from muzzle. Detonate the TNT charges simultaneously. Thirty to fifty half-pound blocks will be needed for effective demolition. If it is not possible to plug the bore, a larger number of TNT blocks will be needed for effective demolition.
(2) Ram an HE shell (without base fuze) into the forcing cone and place TNT blocks behind it, as specified above. Close the breechblock and detonate the TNT charge. A sufficient length of safety fuse should be used to permit personnel to reach safety zone or cover. The fuse may be routed through the primer hole in the spindle.
(3) Attention is invited to the fact that, for the larger calibers, the number of blocks to be used is an estimate not proved by tests.
d. Method No. 3.
(1) Place unfuzed incendiary grenades M14, on their sides, one on top of another, in the chamber. Close the breech. Equip another incendiary grenade with a 15-second safety fuse, ignite, and toss it in the muzzle. Quickly elevate the cannon to its maximum elevation. Elapsed time: 3 to 5 minutes. Six to eight grenades per cannon are required.
(2) The metal from the grenades will fuse with the interior of the breechblock, making it impossible to open the breech.
e. Method No. 4.
(1) Fire adjacent guns at each other at point-blank range, using HE or AP shells. Two or more direct hits from a weapon of the same caliber, on a vital spot such as the breech mechanism, recoil mechanism, or tube should adequately destroy the artillery piece. Fire from cover. Danger space is from 200 to 250 yards.
(2) Destroy the last gun and carriage by the best means available.
(3) Danger from cannibalization is inherent in this method.
f. Ammunition. Instructions for demolition of ammunition are contained in TM 9-1901.